Showing posts with label baking. Show all posts

Tuesday, September 14, 2010

Cakeballs With a Twist

Cakeballs are all the rage.  Traditionally you bake a cake, crumble it up, add a frosting to it, roll into balls and refrigerate (or freeze if you're as impatient as I) and voila!  YUMMY!

Before I even knew what a cakeball was, I had a recipe that was passed down to me from my mother who got it from her mother...  it was a recipe to simply not waste leftover cakes and cookies. 

My mother would gather leftover cakes from after the holiday hoopla and would mash it all up, she'd also add teabiscuits or cookies she had lying around and crumble them, too, and add it to the mishmash in her big bowl.  She'd stir it all up and then go prepare the chocolate.  She'd get some baking chocolate, some butter, sugar, coffee, add a little chocolate liquor, or irish creme` liquor or somesuch to the mix and stir it in a double boiler until it was all melted.  Then she'd pour the hot mixture over the crumbly mishmash in her big bowl, mix it all up and add a wee bit of water if there was any need.  She'd roll some into balls and sometimes make long logs.  She'd top it off with coconut shaving and refrigerate.  Delish!!

It has a  vastly different taste than the traditional cakeballs we see everywhere.  I used to make it for the holidays but didn't know what to call it lol  my mother had no name it for it, either.  It was simply a recipe that was used to not waste food!  How ingenious, huh? 

I'll give you the recipe but honestly, I eyeball it and add a wee bit more of this or that...  here's a rough idea of what is added:
  • About 1/2 a bar of baking chocolate (I break off about 4 pieces usually)
  • 1/4 cup of sugar
  • 1 stick of butter
  • 3/4 cup of instant coffee
Stir the chocolate, sugar and butter on a double boiler.  Stir stir stir till it's all melted... add the coffee, and you can add some liquor if you wish.  I've even added a capful of butter rum.  When rolling it into balls and you notice it's still a bit dry, you can add more coffee or water to it. 

And there ya go!  Easy peasy!  I've called it rum balls, irish creme` balls lol   Honestly never thought to call it cakeballs, but I guess technically that is what they are -cakeballs with a twist!


If you repost this recipe please give credit where credit is due and link to my blog, please.  Thank ye kindly! :)

Sunday, September 12, 2010

Honey bars

Absolutely DELISH!  Found this recipe online some time ago and I love making it in the Autumn.  Something about Autumn and gooey honey bars, or honey cake...  YUM!

Here's the recipe:


Honey bars:
3/4 c. oil 2 c. flour
1/4 c. honey 1/2 tsp. baking soda
1 c. sugar 1/2 tsp. salt
1 egg 1 tsp. cinnamon

Icing:
1 c. powdered sugar
1 tsp. vanilla
A few drops of milk

Directions:
Mix the oil, honey, sugar and eggs together. Set aside, and mix the flour, baking soda, salt and cinnamon separately. Add dry ingredients to the first mixture. Mix well (it will be thick). Spread into a greased pan (I use a half-cookie sheet), and bake at 325 degrees for 15-18 minutes. Mix icing ingredients together; the consistency shouldn't be too thick, but not too runny either. I add the milk 1/4 tsp. at a time while stirring until I get it right. Ice while warm. Cut into squares after it has cooled.

Easy peasy and absolutely delish! 


Found the post with the original recipe!  Credit for recipe here.

Wednesday, September 8, 2010

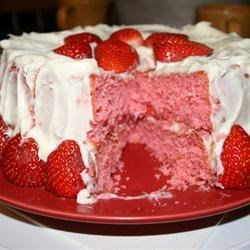
Strawberry Cake

My daughter was getting tired of the same'ol same, I guess, so she asked that I make her a stawberry cake for her birthday.  Suuure honey, I said!   And off I went searching high and low for a cake like that.

I came across one I really liked and it has over 200 positive reviews.  Must be good then, right?  Right.  So here is the recipe, however, some changes were made so here is the recipe I followed:

Ingredients:

• 2 cups white sugar
• 1 (3 ounce) package strawberry flavored gelatin
• 1 cup butter, softened
• 4 eggs (room temperature)
• 2 3/4 cups sifted cake flour
• 2 1/2 teaspoons baking powder
• 1 cup whole milk, room temperature
• 1 tablespoon vanilla extract
• 1/2 cup strawberry jelly (we used smuckers brand)

Directions:

1. Preheat the oven to 350 degrees F (175 degrees C). Grease and flour two 9 inch round cake pans.

2. In a large bowl, cream together the butter, sugar and dry strawberry gelatin until light and fluffy. SEPARATE the whites and yolks… add only the yolks, mix well.

3. Whipped the whites into soft peaks and folded them in at the end.

4. Combine the flour and baking powder; stir into the batter alternately with the milk. Blend in vanilla and strawberry jelly. Divide the batter evenly between the prepared pans.

5. Bake for 25 to 30 minutes in the preheated oven, or until a small knife inserted into the center of the cake comes out clean. Allow cakes to cool in their pans over a wire rack for at least 10 minutes, before tapping out to cool completely.

I love how you can put chocolate frosting, or serve with vanilla ice cream.  So versatile!  And it really truly tasted very strawberry-tastic!


Original recipe can be found here. Photo taken from allrecipes.com where the original recipe is found.

Saturday, August 28, 2010

Some questions answered

I received an email asking about the goodies in my daughter's birthday party.  Yes, I did bake just about everything you see there.  The hubby gets credit for the ladybug chocolates, though.  He had the patience to do those candy mold doodats.  I just kept giving the ladybugs a black eye LOL 

It took TWO HOURS to dip the pretzels in red and dark chocolate..  my hands were cramping up but they were sooo good and so worth it!!

The lovely 3D ladybug cake topper is from the wonderful Julie over at Cakes and Kids.  She is so awesome to work with!! 

The birthday cake is from scratch and it's a homemade strawberry flavored cake (daughter requested flavor).  May not look purty but it was YUMMY!  And there was not a slice left by the time the party ended. 

I did cheat on the cupcakes..  that's a butter recipe cake mix, however the chocolate ganache on top I did make.  Hubby added a wee bit of Irish creme liqour and it was sooooooooo good!!

Also made the yummy cake pops and dipped them in red candy melt and then added some black sprinkles.

Hubby makes a divine punch!!  I'll have to find the recipe for that and share it.  It is SOOO good!  It was originally a recipe I found online but he has altered it so much that it's nothing like the original I found.  It is GOOD!

The decor...  yes, I made the cupcake stand.  Also designed and printed the birthday banner.  You can't quite see it clearly from the pics, but it's got cute little ladybugs flitting around the letters.  Designed the cupcake toppers, labels, etc.  Also punched out some black dots using my Friskars 1 inch squeeze punch and then just sprinkled it all over the red tablecloth.  Super easy and cute!

Can't think of anything else, but feel free to email me with any questions!  (...baby's crying so gotta run!)

Saturday, August 14, 2010

The Party

Exhausted beyond belief!  But it was a big hit :)


Wednesday, August 11, 2010

Friday, June 4, 2010

Whatcha up to, Cupcake?

Cupcakes and more cupcakes!  That's what I've been up to!  Whew... thank goodness it's over!  Although, now that my girls turned one it makes me miss all those itty bitty newborn moments...  sigh.

So you wanna see what I did for their birthday?  Feast your eyes on the PINK Cupcake themed birthday party!


Yes, everything you see on that table was made by moi!  I made the cupcakes, the vanilla-pink and chocolate covered pretzels, the strawberry-fudge cake-ball pops dipped in vanilla chocolate and covered with sprinkles!  And I even made the cute pails to hold the cake-ball pops!  (more on how I made the pails below!)

My Cupcake Birthday Cake.  Yes, I did make it!  With the help of hubby, of course ;)  Hubby made the chocolate liner... isn't it awesome looking??  ALL edible!
and the cuppy-cakes, of course:


Yes, I did design and print and punch out those adorable cupcake-toppers on the cupcakes!  You can download the cupcake toppers here.  Please remember they are for personal use only (not for resale or commercial use!  The cupcake image was found online for personal use.) And I used Friskars Squeeze-Punch -XL Seal of Approval.

...............and what's a party without SMASH cakes?  Or better yet!!!  Cupcake Smash Cakes!

kept their smash cakes simple!  just yellow cake and vanilla frosting.  first time they had sugar!  and boy are they not getting anymore sweets for a good loooong time!  they were SO crabby and on a total googley-eyed sweet-overload state for several hours!


It was OH so fun!!  Especially the cleaning up after lol

And the cute pails...  oh, how I love the pails!!  Lemme show you how I got them to hold the cake-ball pops in place.

First you'll need:

pails  (Target had these on sale!!)
tissue paper (color of your choice)
styrofoam
tulle
scissors

My styrofoam was huge so I grabbed a large shopping bag and set it at my feet and placed the styrofoam in and cut it up into rectangle pieces.  It's VERY messy when you cut, hence the shopping bag to catch the mess.

One I had the shapes I wanted cut up, I covered it with my tissue paper (pink in this case) and set it aside.

I cut up some tulle -about 22 inches long.  2 strips for each pail.   I set them on the table one strip over the other but in a cross.    North to South and West to East position, if that makes any sense.

Then I set my styrofoam covered in tissue paper right in the center, the ends of the tissue paper down.  Then pick it up, tulle and all and set it right in the pail like so:

and tuck the ends of the tulle gently inside as much or as little as you want so it looks like this:

and there you have it!  The pops will now stay in place when you stick'em in your cute pails.  :)

{click pic to enlarge!}

Saturday, March 13, 2010

The Red Fad

Can someone explain the facination with red velvet cake!?  Seriously, I never even knew what red velvet cake was till this past Valentine's. 

Since I do some fun baking with my oldest, I was trying to figure out what ingredients I would need for our baking for Valentine's.  I was reading all the rave about this awesome red cake so I figured, what the heck!  Let's try it, too!

Holy moly, red food coloring, batman!  Do you guys know how much red food coloring this cake has!?  Seriously!  Whether you buy the cake mix or do it yourself with your own bottle or two of red food coloring, it's still a heckuva lot!  Not to mention if you drip any batter, you will get a red stain.  Yuck!

So I succumbed to this red cake fad and did give it a try.  It does look cute.  Please don't kill me, but that's the last time I will ever be making them!   Personally, I thought it tasted nasty.  You could barely taste the chocolatey chocolate that it was.  Yick.  But for your viewing pleasure, here is my red velvet cupcake with ganache chocolate frosting: